
In my last post I described the switch from Windows to CachyOS (Linux) on my Desktop and Laptop. This happened to be some starting fuel for this next phase in my H0melab/tech Journey.
History:
My previous job-role gave me the responsibility to inventory & manage the “orphaned” company’s data-center based on VMware ESXI. In the end my team was responsible for managing around 40 nodes and +/- 2000 virtual machines. Right before my departure a big new project was started to migrate from VMware ESXI to Proxmox.
My experience with Proxmox is relatively new and more hobby based than production enterprise. The concept of the OS is still a Host/virtualization OS with lots of similarities which meant my general knowledge was still useful and gave me a semi head start.
Present day:
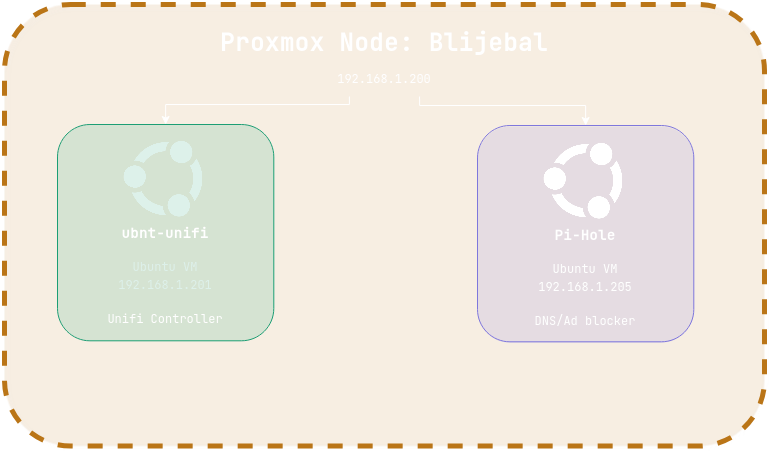
With building a home-lab there is always a start and I am not sure if there is a end.. The start for me was the idea of tinkering with Linux again and maybe setting up a few services I could benefit from. So think in the likes of a Unifi Controller to manage my Unifi AP AC Pro from Ubiquiti, Pi-Hole to get rid of a lot of ads ruining site’s these days, a game server to host a modded Minecraft session for me and my friends to play around in.
These services were build on my first Proxmox install at home. Based on a pretty decent Dell XPS 9500 laptop with the following specs:
Intel Core i7 10750H (6 cores, 12 thread)
32GB DDR4 RAM
1TB SK-hynix Gen 3 NVMe SSD
Nvidia 1650ti 4GB
As this is a decent machine with 32GB of RAM there was quite a lot of room to play and tinker with before a upgrade was needed. A little challenge that I needed to overcome was that a laptop like the XPS 9500 only has 3 type-C USB ports for IO. So a USB-C to Gigabit Ethernet adapter was used to make sure we had a stable Gigabit network connection back to the switch.
Starting the installation I made sure to edit the DHCP scope of my ISP’s router so my static IP address would not interfere with the predefined IP pool/scope. The install of Proxmox itself was very straight forward. Download the ISO, create boot-able USB with RUFUS, Balenaetcher or software to your liking, make sure you can enter the boot menu of the device and choose for the GUI install. I configured the Network settings, Password for the Root account, storage distribution and waited for the install to finish. After the install the Proxmox environment was available via the https://192.168.1.200:8006 and I could start setting up VM’s. Downloading Ubuntu ISO’s straight to the ISO datastore (neat feature!) and tinkering around was on its way!
After creating and spinninng-up the first VM’s the Proxmox setup seemed plain and simple. The home network was adjusted from 192.168.1.1-200 which meant that 200-254 was available for the homelab setup.
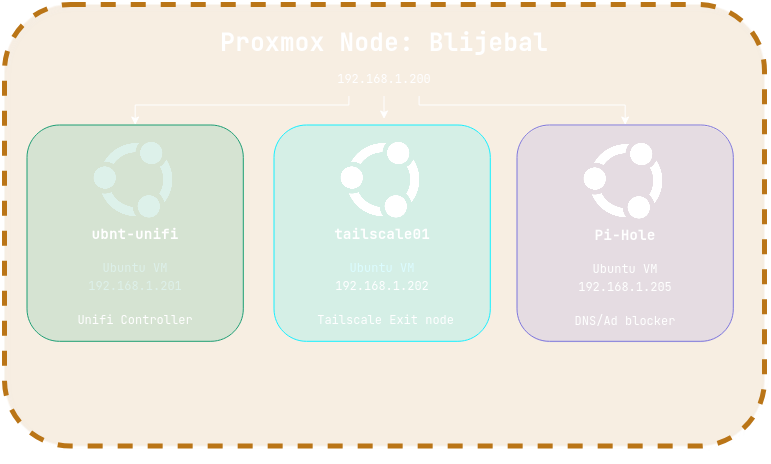
I started adding more and more VM’s,Tailscale for remote access to Proxmox, unifi, remote DNS? This all made it so the space regarding RAM usage started to fill quickly.
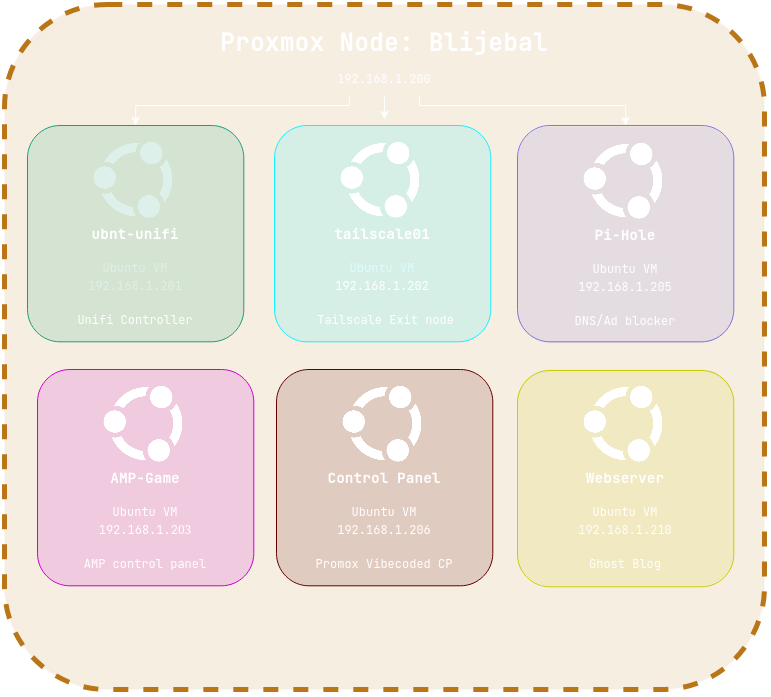
The Game server already had 16GB dedicated to it and the Minecraft modpack server was a heavy one and loved lots of RAM. As I wanted to also host more game-servers for games like Euro truck simulator 2 and American truck simulator I knew there was a upgrade needed in the future.
But for now there was enough space and upgrading meant adding a extra node for me as the machine was not worth it for a 64GB RAM investment. There were no backups being made and everything was in “Alpha” phase for now. I already had so many thoughts in my mind for extra VM’s and tinkering that for my next investment there should be a revamp of the home network. Things were not that safe the way it was configured and there was no VLAN separation or segregation being applied as the network hardware did not support it. The start ended when the following setup was realized. Space was getting a issue and I started to look for a new host, extra host, multiple devices to cluster and to replace the XPS 9500? Untill that time comes we are doing it with what we got and it ended up like this:
Leave a Reply